Looking for something gooey yummy and warm for those chilly winter nights? Or maybe a nice addition for a weekend breakfast hash with eggs? Or a crispy, mild celery flavored ingredient to shred onto a fresh taco? This versatile winter root vegetable can virtually ‘do it all’!
Even if you just want something that feels like eating a nice soft pile of potatoes without the nightshades, calories or high carbs? Well, look no further, because you’ve found your dream root crop vegetable, and its name is Celeriac.

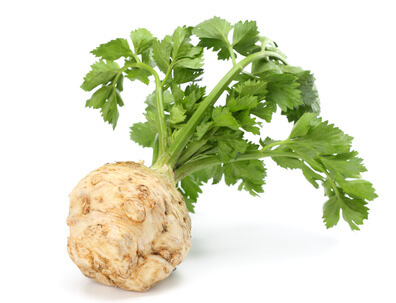
Celeriac Root with Leaf
Best Seasons for Adding Celeriac to the Menu
This close cousin of the crisp green stalks found in everything from cocktails to kids snacks, celeriac is the underground relative in the celery family who doesn’t come out until late fall. In the Pacific Northwest you’ll see the large brain-like root crop stacked in piles at the Farmers Market starting around November. (Makes them a great potato substitute at Thanksgiving.)
And for those with Farmers Markets that go throughout the winter, they will stay until around March or early April, depending on the year and the length of the winter chill. Once it gets warmer, they’ll be gone until the following fall.
Selecting the Best Celeriac to Bring Home
Celeriac are commonly found in smaller, 3 to 4 inch size, but are by far more impressive and provide a lot more bang for your buck at the 6 inch or larger ‘brain’ size we see so commonly in Oregon and Washington. There is a rumor that they are woodier at the larger sizes, but that has more to do with freshness, hot dry growing environments, and local availability than size. And larger specimens are easier to work with, whether it’s shredding, dicing, slicing or cubing to sauté’ into my favorite side dish.
When shopping for celeriac, look for dry, thick skinned specimens. Even smaller ones, if that’s all you can find, are worth getting if they are not wet and starting to go soft. When the celeriac is smaller it can rot faster, so be careful to inspect them and select only firm, slightly moist to almost dry-feeling tubers. If they are very wet but still very firm and intact, dry them well before storing them. Because they grow underground, they are often wet from washing after harvest. That’s okay as long as they have not been left that way for any length of time.
Storage
Celeriac store well for up to a few months under the right conditions. They need to be chilled, and they need to be fairly dry. Do not let them stand in moist plastic, even under refrigeration, or they’ll get soft and rot. Sticking your hand into a mushy rotting celeriac is just no fun for anybody.
A cold crisper drawer without excess moisture is best for long term storage. Check them regularly for soft spots or browning. Remove and use any that are getting soft and keep only firm specimens, or they can all ‘catch’ the spoilage. (One bad apple can spoil the whole bunch, girl!)
How to Use Celeriac in Your Cooking
They make a superb addition to any stew or roasted veggie dish – toss them in with beets and carrots diced up with a little thyme and a splash of olive oil in a hot oven for 45 minutes and you’ll wonder how you lived without their delicate sweet addition to the mix. Or if you’re all about the fresh raw goodness of their delicate flavor, grate them fine and use them in your salads or as toppings on soups and stews or tacos.
Another great way to enjoy them is cubed and sautéed before adding to a breakfast hash of scrambled eggs and whatever your favorite ingredients might be – from bacon to broccoli it all works and it’s all delicious. Top with a little of your favorite cheddar or goat gouda and you’ll be wishing there were some leftovers for lunch!
However you enjoy them, you’ll be getting a load of excellent nutrition and a lot less carbs and trouble than your average potato will offer.
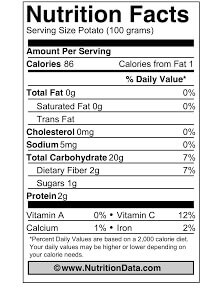
Here’s how celeriac stacks up in the nutrition department:
Celeriac: Potato:

Celeriac Complete Nutrition Table for one 2lbs Celeriac/by 8 ounce serving:
| Nutrient | Amount in 8oz | %DV/8oz | Nutrient | Amount in 8oz | %DV/8oz | |
| Calories
[cal] |
95 | Omega-3 Fatty Acids [g] | 0.00 | |||
| Carbs [g] | 20 | 7% | Pantothenic Acid [mg] | 0.91 | 9% | |
| Sugars [g] | 4 | Phosphorus [mg] | 260.82 | 26% | ||
| Soluble Fiber [g] | 4 | Potassium[ mg] | 680.39 | 19% | ||
| Protein [g] | 3 | 5% | Selenium [mcg] | 1.59 | 2% | |
| Fat [g] | 1 | 1% | Sodium [mg] | 226.80 | 9% | |
| Biotin [mcg] | 0.00 | 0% | Vitamin A [IU] | 0.00 | 0% | |
| Calcium [mg] | 97.52 | 10% | Vitamin B1 (Thiamine) [mg] | 0.00 | 0% | |
| Choline [mg] | 20.41 | 4% | Vitamin B2 (Riboflavin) [mg] | 0.00 | 0% | |
| Chromium [mcg] | 0.00 | 0% | Vitamin B3 (Niacin) [mg] | 0.00 | 0% | |
| Copper [mg] | 0.23 | 11% | Vitamin B6 [mg] | 0.45 | 23% | |
| Folate [mcg] | 18.14 | 5% | Vitamin B12 [mcg] | 0.00 | 0% | |
| Iodine [mcg] | 0.00 | 0% | Vitamin C [mg] | 18.14 | 30% | |
| Iron [mg] | 1.59 | 9% | Vitamin D [IU] | 0.00 | 0% | |
| Magnesium [mg] | 45.36 | 11% | Vitamin E [IU] | 1.36 | 5% | |
| Manganese [mg] | 0.45 | 23% | Vitamin K [mcg] | 92.99 | 116% | |
| Molybdenum [mcg] | 0.00 | 0% | Zinc [mg] | 0.68 | 5% |
Ingredients
- 1 large celeriac peeled and cubed into 1/2 to 3/4 inch cubes.
- 2 tablespoons coconut oil
- salt and pepper to taste
- thyme optional but always delicious!
Instructions
-
Peel and cuber the celeriac into ½ to ¾ inch cubes.
-
Half way through, start the coconut oil to melt in a large skillet or sauté pan over medium heat. Get the oil hot (heat to 200-250 degrees).
-
Add the celeriac.
-
Stir gently in the pan and allow it to get sizzling hot.
-
Continue to gently stir until all sides of the cubes have been well coated in the oil and turned toward the pan surface - about 3 to 4 minutes.
-
Cover and reduce heat to low for 10 to 12 minutes, giving the pan a good shake or running a spatula under the cubes to loosen them up and toss them around a few times during cooking.
-
Test for done-ness - soft is done. If they aren't quite soft enough for your liking add a tablespoon of water and toss in the pan again to let them steam up the last bit.
-
Salt and pepper and season to taste.
-
Serve hot with fresh steamed greens, and a main dish of your choice.
Recipe Notes
Excellent with chicken, beef, or fish.
Variations: Add diced onions and garlic to the pan after the celeriac has been started for a more robust flavor. Or add one red beet, cut into slightly thinner cubes than the celeriac. Toss it in at the start with the celeriac for a bright red slightly sweeter side dish – delicious!


Leave A Comment